
How To Prepare A Concrete Floor For A Vinyl Tile
Vinyl flooring is a popular choice for Australians due to its durability, affordability and range. A positive end result, however, hinges on how well you prepare a concrete floor for a vinyl tile.
Step 1
Clean the old concrete floor surfaces thoroughly
Take care in removing any polishes, varnishes, oils or soaps from the concrete surface.
Step 2
Achieve a smooth surface
Paints and other contaminants can cause roughness in the concrete and potentially reduce or compromise the contact area. Large spalls could also cause a show-through effect, depending on thickness of the vinyl. If you do have a thin vinyl, it would be prudent to apply a smoothing coat first.
If there are is number of issues in the smoothness of the concrete, you will need to apply the appropriate level of floor preparation (grinding, levelling, patching, skim-coating) to achieve a smooth flat surface. Imperfections in the subfloor can be fixed using either floor levellers or floor repairer kits found at most hardware stores.
At the very least, you may need to lightly sand the concrete to create a slightly rough surface to assist the adhesive bond.
Step 3
Check the subfloor for any pre-existing moisture conditions
If rising moisture issues are present, then this should be addressed via a moisture barrier system such as a liquid system applied by brush or roller. This would generally be required if the floor showed signs of rising dampness and is sometimes associated with no black plastic present between the foundation slabs below. It won’t set you back time-wise: generally most primers take 30 minutes to dry before and adhesives are applied.
Step 4
Decide whether your concrete floor needs a Primer
If there are no moisture issues then sealing would not be necessary. Highly porous concrete or timber subfloors should be primed before applying adhesive. A good quality Primer should also increase adhesion.
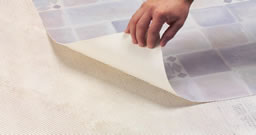
Step 5
Choose the right adhesive and adhere to application instructions for best adhesion
The quality vinyl adhesives are water-based and high strength. They are fairly easy to spread using a 1.6 x 1.6 x 1.6mm “V” notched trowel. Allow the adhesive to become “tacky” before laying the vinyl onto the adhesive. This should take approximately 10 minutes. Some manufacturers differentiate between sheets, tiles and planks for their adhesives. Check to see if the adhesive manufacturer lists your type of vinyl (sheets, tiles or planks) on the product you buy.
The adhesive should not be applied in extremely hot or cold conditions (i.e. below 8°C or above 35°C). When opened, it’s best not to leave it open in warm air for more than 20 minutes as a skin may form on the surface. Whilst this could be removed prior to using the adhesive further down in the bucket, it is best to not allow the product to skin. If you are living in extreme weather conditions, you can opt for a spray-on adhesive which eliminates this from occurring and speeds up the setting time exponentially (immediate versus 24 hours).
Applied correctly, a quality vinyl adhesive should include a 10 year Warranty, allowing your investment to stand the test of time.
Watch this video to follow a visual summary of the above instructions.